
Watch Your Background

Watch Your Background

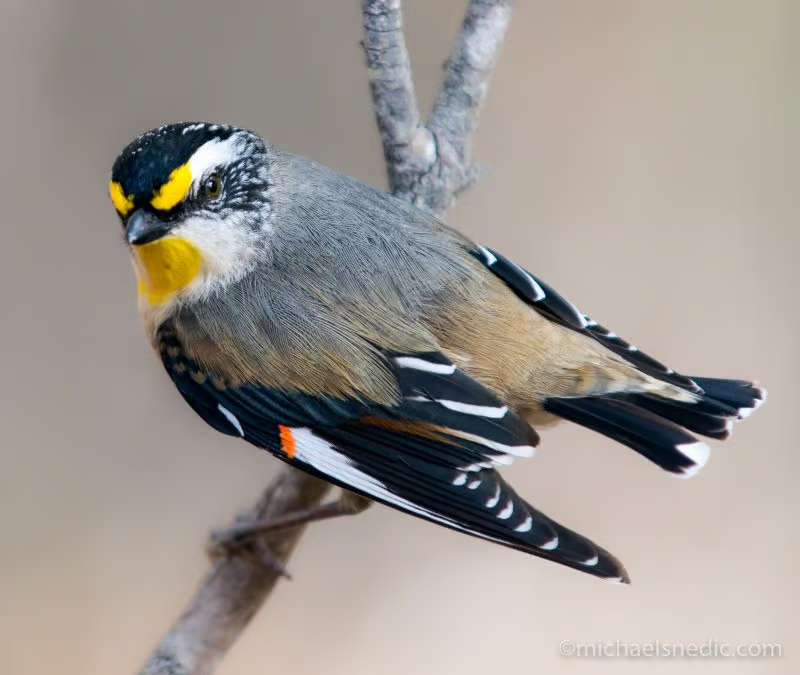
Striated Pardalote

When taking images of wildlife or people, there is nothing worse than a distracting background. It basically takes the viewer’s eyes away from the subject you are wanting to portray. I’ve heard some photographers say “I’ll fix it in Photoshop”, but my theory has always been to get it right in camera first, so you end up with more time out in nature with your camera and less time on the computer!

#1 Beware of Trees and Poles

One of the most common mistakes I see when reviewing images taken by my photo workshop and tour participants, is seeing trees or telegraph poles sticking out the back of animal’s heads! Often photographers are so absorbed in what they are focusing on (literally) that they completely miss the background!

#2 Man-made Objects

When you are out in nature photographing wildlife, be careful not to accidentally include man-made structures such as posts, fences or buildings end up in your shot. It’s certainly more appealing to have a native animal ‘in the wild’ then to have mad-made subjects in the background.

#3 Photographing Through Wire at a Zoo or Wildlife Park

Zoos and wildlife parks can be great places to practice your wildlife photography. The only problem is that in some cases, you will have wire between you and your subject. Many photographers aren’t aware that if you go right up to the wire and focus ‘through’ it and onto your subject, you can completely blur out the wire.

#4 Blurring Out Your Background

It’s not always possible to get rid of distracting subjects in the background (difficult access, for example). In this case, you may want to use a wide aperture as this has the effect of completely blurring the background. This is especially so if the subject is near you and the background distraction is far away.

#5 Choose Your Spot

Often, it’s simply a matter of moving around until you get the best possible background. If I see a bird perched on a branch and there is a distraction in the background, I’ll usually move around until I find a clear background.

If you have a passion for African wildlife, nature or travel photography and would love to go on a specialised small-number, professional African photo safari, please get in touch with Michael Snedic at WildNature Photo Expeditions. You can call him on 0408 941 965 or fill in this Contact Form and he will get back to you ASAP.

Photographing In Cold Climates

Photographing In Cold Climates

Seal Encounter - Antarctica

Whether you are on a photo tour to Tasmania, or on a photo expedition to locations such as Antarctica or the Arctic, photographing in cold climates can have its challenges. Below are some tried-and-tested tips and suggestions I have used over many years, to make it easier to photograph in such environments.

#1 Wear Lots Of Layers

It’s important that you are warm, comfortable and dry when out in cold or freezing conditions. Wearing lots of layers will keep you dry and also makes it easier to remove a layer or two when it warms up. One main outer jacket is best, which is lined for warmth, but also waterproof.

#2 Fingerless Gloves

One of biggest challenges when photographing in cold climates is being able to work the cameras settings, without freezing your fingers. I strongly suggest you wear a pair of light cotton gloves, then use a pair of fingerless gloves, with flaps that can cover your exposed fingers when you are not photographing. Wearing thick ski gloves, for example, make it impossible to work your camera’s dials.

#3 Be Careful Of Extreme Temperature Changes

One of the biggest problems many photographers encounter when photographing in freezing environments is lenses fogging up. This often happens when your gear has been in a warm, heated room and you suddenly venture into the cold, or vice versa. My suggestion, when going from hot to cold or cold to hot, is to let the camera/lens ‘acclimatise’ slowly. If you are coming in from the cold, you can place the camera/lens on your bed, under a sheet or doona. That way it will change temperature gradually and condensation won’t occur.

#4 Watch Your Metering

When photographing subjects in snow, I recommend using Evaluative Metering (Canon), Matrix Metering (Nikon) or Multi-Pattern (other brands). This metering allows the camera to read the whole scene you are photographing. Since the camera’s sensor normally renders the scene a ‘grey’ color, I suggest increasing the exposure, bringing the snow or ice back to a white, as it should be.

If you have a passion for African wildlife, nature or travel photography and would love to go on a specialised small-number, professional African photo safari, please get in touch with Michael Snedic at WildNature Photo Expeditions. You can call him on 0408 941 965 or fill in this Contact Form and he will get back to you ASAP.

Tips For Improving Your Landscape Photography

Tips For Improving Your Landscape Photography

View over North Bay

There are many aspects to achieving a stunning image of a landscape. In this article, I am giving you some tips and techniques to help you get better shots.

#1 Rule Of Thirds

When photographing a seascape, for example, the important ‘rule-of-thirds’ plays an important role in getting the image looking ‘right’. Instead of putting the ocean’s horizon in the middle of your shot, which looks too ‘set up’, I highly recommend using the ‘rule-of-thirds’. You can compose your image so that you have one third land, one third water and one third sky. You could choose to have one third land and two thirds sky or even two thirds sky and one third water. This ‘rule’ really does work so if you haven’t tried it before, why not give it a go? You will be surprised by the results!

#2 Think Portrait

So many photographers, when photographing landscapes, only think in terms of ‘landscape format’ (i.e.left-to-right) and not in ‘portrait format’ (i.e. upright). Many landscapes lend themselves to being taken in portrait form, especially if the landscape includes very tall trees, high rock formations or scenes where you want to incorporate the foreground, mid-section and sky in full. In some case, I suggest taking images in both landscape and portrait format and see which one works best.

#3 Foreground Detail

Having a subject in the foreground of a landscape makes for a more interesting image, in my opinion. It may be a large rock, tree, a flowering plant or similar. When the person viewing the image looks at it for the first time, his/her eyes will generally go to the foreground subject and then lead onto the landscape. Foreground detail makes for a much more interesting image.

#4 Best Light Conditions

Early morning (around sunrise), plus late afternoon (around sunset), generally makes for much nicer landscape image sand creates a real ‘mood’ in many cases. Due to the low light conditions encountered during these times, it is necessary to use a sturdy tripod and a remote or cable release, otherwise the image will be blurry. Also, since you are using a tripod, I recommend you set your cameras ISO setting to 100 (or the lowest setting on your camera), to minimise any potential ‘noise’ that may be visible by using a much higher ISO.

#5 Use Water As A Reflection

If you are photographing a landscape scene near a lake or lagoon, and it is a calm day, I recommend utilising the water’s reflection to create an evocative image. This is especially effective when shooting at sunrise or sunset.

#6 Leading Lines

A photo of path within a landscape, which leads the eye out of the ‘scene’ can be a very powerful composition. It keeps the person viewing the image interested, as they often ask themselves “where does that path lead to”?

If you have a passion for African wildlife, nature or travel photography and would love to go on a specialised small-number, professional African photo safari, please get in touch with Michael Snedic at WildNature Photo Expeditions. You can call him on 0408 941 965 or fill in this Contact Form and he will get back to you ASAP.

How To Best Photograph Rainforest Scenes, Including Waterfalls

How To Best Photograph Rainforest Scenes, Including Waterfalls

Rainforest buttress roots - Bunya Mountains

Standing in a rainforest, camera ready, is a wonderful experience. An image taken in a rainforest, taken under the correct conditions and using good photographic techniques, can look absolutely stunning. Below are some photographic tips to help you achieve great images.

#1 Shoot On An Overcast Day

Without exception, shots taken in a rainforest look so much more ‘natural’ when taken on an overcast day. The lighting is very even and diffused and the rich greens usually look their best. Shooting on a bright, sunny day creates images with lots of very harsh light and shadows – not very appealing to the eye. Whether it’s a mossy buttress root, a waterfall or a cascade, I strongly advise waiting for a cloudy day before you venture out with your camera.

#2 Using A Tripod

When using small apertures (high number) such as f11 or f16, it can be near-impossible to hand-hold your camera and get a sharp image, especially if the day is gloomy/dark or there is a thick canopy overhead. A sturdy tripod is an essential piece of equipment for getting great rainforest shots in low light and using small apertures (in size).

#3 Using A Circular Polariser

For the last 20+ years, I have been a strong advocate of using a Circular Polariser when taken shots in a rainforest. The Polariser has a number of different benefits, including reducing glare off water or shiny rocks and leaves, slowing your aperture by 1.5 to 2 stops, giving any running water more of a milky effect and also adding a touch of saturation to your images, without making them too gaudy or fake.

#4 Think Outside The Square

Apart for the obvious landscape rainforest image (landscapes, waterfalls and cascades), think about taking close-up images of patterns on tree trunks, moss on rocks and macro subjects such as ferns or fungi. Along with your landscape shots, these subjects add variety to your rainforest portfolio.

#5 Creating That ‘Milky’ Effect For Waterfalls

On a dark, gloomy day, by using an aperture such as f16, you can usually achieve a slower shutter speed, which gives you a ‘milky’ effect to the water. If you would like the water to me more milky, then using a neutral density filter will slow the shutter speed considerably.

#6 Be Patient

Sometimes, when you arrive at a waterfall, light conditions just aren’t quite right. The sun may still be behind the trees or nearby cliff or the sun may be out, creating harsh light. By being patient, often the conditions change or improve. The sun might end up shining ‘through’ some shrubs, creating stunning rays of light, or clouds might come across and create diffusion. I can’t think of a more relaxing place to sit and wait, than in a rainforest… It will be well worth the wait!

If you have a passion for African wildlife, nature or travel photography and would love to go on a specialised small-number, professional African photo safari, please get in touch with Michael Snedic at WildNature Photo Expeditions. You can call him on 0408 941 965 or fill in this Contact Form and he will get back to you ASAP.

Photographic Tips – Macro

Photographic Tips – Macro

Fungi


Below are some photographic tips and techniques, to help you achieve better macro images.

#1 Portable Diffuser

If you are out photographing fungi, for example, and the sun is shining bright, I strongly recommend using a portable hand-held diffuser. This is placed between the subject and the sun (therefore blocking out the harsh effect of the bright sun on your subject) and creates a nicer, more evenly-lit image.

#2 Reflector

When photographing subjects such as trumpet- shaped flowers (e.g. fuchsia, most roses, hibiscus etc), a hand-held reflector can be used to remove any shadows inside the flower. By holding the reflector in a way that reflects natural light onto the shaded part, it creates lovely, even lighting.

#3 How Do I Focus Closer?

I have been asked countless times by photographers “How Do I Get Closer Focus On Tiny Subjects”? The answer is quite simple – buy yourself a set of Extension Tubes. These tubes fit in between the camera and lens of an SLR and allow you to focus much closer than your minimum focus distance usually is. There is no glass in extension tubes, so you won’t lose any image quality. You will, however, lose light so a tripod or flash unit is needed in order to avoid blurry images.

#4 Using A Macro Clamp

A macro clamp is a device designed to hold moving plants still, especially outside on a windy day. One end of the clamp is attached to your tripod leg and the other to the stem of a moving plant, holding it still. I have had one for many years and highly recommend this product!

#5 Using The Aperture To Change Depth of Field

If you are planning to photograph a plant with a stamen that’s quite colourful, you might want the stamen to stand out. You can do this by using a shallow depth of field (such as f4 or f5.6). Alternatively, you might light to capture more of the flower, so using an aperture of f16 or f22 is recommended.

#6 Automatic or Manual Focus?

I personally prefer using manual focus for my macro subjects, unless its a moving subject such as a bee buzzing over a flower, where auto focus is much easier to use. When using a tripod, I suggest using manual focus, in conjunction with the camera’s Live View set`ting. This makes it so much easier to focus more accurately.

If you have a passion for African wildlife, nature or travel photography and would love to go on a specialised small-number, professional African photo safari, please get in touch with Michael Snedic at WildNature Photo Expeditions. You can call him on 0408 941 965 or fill in this Contact Form and he will get back to you ASAP.
Would you like a FREE copy of my new Ebook?

Download Button

ebook The Art of Wildlife Photography by Michael Snedic July 2026 cover

You have Successfully Subscribed!