Noisy Pitta Pitta versicolor, sometimes known as the Jewel Thrush or Anvil Bird. The Latin versicolor refers to the various colours of the bird’s plumage.
‘WALK TO WORK, walk to work’ – this was the unmistakable call of an adult Noisy Pitta Pitta versicolor as it flew towards its nest at the base of a Black Booyong tree. In response, two small heads appeared from the nest entrance. Shortly afterwards, one of the chicks summoned up the courage to leave the warmth and security of the nest and venture into the open…
By now, both parents had arrived and were fussing excitedly over the chick. This prompted the second chick to follow suit. The chicks seemed totally bewildered by all this attention, with both parents circling nervously as if to protect their offspring from the dangers of the ‘real’ world outside. Within minutes the parent birds disappeared, only to return a short while later, beaks brimming with tasty morsels.
Seeing the chicks fledge at such close range was a memorable moment, made possible by the camouflaged hide I was sitting in. Although living and working in southeast Queensland’s Lamington National Park had given me other opportunities to witness the Noisy Pitta’s nesting habits, I had never before been able to observe the birds or record their behaviour so minutely. The hide also enabled me to photograph the Pittas without disturbing them.
Distribution and habitat
Of the three Australian Pittas (Red-bellied, Rainbow and Noisy), the Noisy has by far the widest distribution, ranging from the Torres Strait Islands in the north to the Hunter Region (NSW) in the south. Mostly found east of the Great Dividing Range, Noisy Pittas seem to be well established in southeast Queensland and northern New South Wales. Over the years, I have spotted them at various locations, including Noosa National Park and Brisbane State Forest (Qld), Border Ranges National Park and Mt Warning National Park (northern NSW).
Fortunately, the Noisy Pitta is not currently under any threat in any part of its range. However, in some areas, the bird’s habitat has been partially affected by land clearance for agriculture and urbanisation, as well as the proliferation of feral cats.
In Lamington National Park, two hours south of Brisbane, the Noisy Pitta’s population is quite steady. Lamington was the third national park to be declared in Australia, in July 1915. This stunning park has the distinction of containing the largest remnant of sub-tropical rainforest in Australia. Covering some 20,500 ha, Lamington also incorporates eucalyptus and beech (Nothofagus) forests as well as wet and dry sclerophyll forests. The sheer diversity of fauna and flora, some of which are exceptionally rare and unique to the area, led to Lamington National Park being listed as a World Heritage Site in 1983.

Antarctic Beech Nothofagus moorei, Lamington National Park. With its vast area of undisturbed, old-growth rainforest, heavy rainfall and rich volcanic soils, Lamington provides ideal habitat for the Noisy Pitta.
With an annual rainfall of 2–3 metres, rich volcanic soil and a large area of undisturbed old-growth forest, Lamington allows the Noisy Pitta to thrive and breed undisturbed. Being mostly ground dwellers, the Pittas spend their days foraging through the moist, decomposing leaf litter of the rainforest floor in search of the many insects found there. Rather than walking or running, they tend to hop along the ground.
At an altitude of 920 metres, Lamington National Park becomes quite cool from the middle of autumn to early spring. My observations have shown that during this period, the majority of Noisy Pittas migrate to lower altitudes, seeking a warmer climate. They tend to leave around April, returning approximately October. There are, however – as always – exceptions to this rule: some individuals will brave the cold during the winter months.
Nest building and breeding
In southeast Queensland, Noisy Pittas may breed from October to February, though mostly November to January. Here in Lamington National Park, their favourite nest sites are the bases of buttress-rooted trees: White Booyong, Black Booyong, Mararie and Green-Leafed Moreton Bay Figs. Quite cleverly, the nest will always be situated on the downhill side of the buttress to prevent it from washing away after excessive downpours.
The pair of Pittas I observed shared nest-building duties, both birds working diligently. Sticks and leaves were used to compose the dome-like structure, which was woven together with thin pieces of grass. Once the nest was complete, the pair lined it with copious amounts of moss and lichen. A distinctive feature was the platform-like structure leading to the nest entrance.
Apart from nest-building duties, both birds shared incubation duties. Three eggs were laid, two of which later hatched (Noisy Pittas generally lay three to four eggs). Incubation started after the third and final egg was laid, with incubation lasting 15 days.
Noisy Pittas are diligent feeders of their chicks – something I experienced while watching this particular pair flying back and forth continuously to the nest, sharing chick-feeding equally.

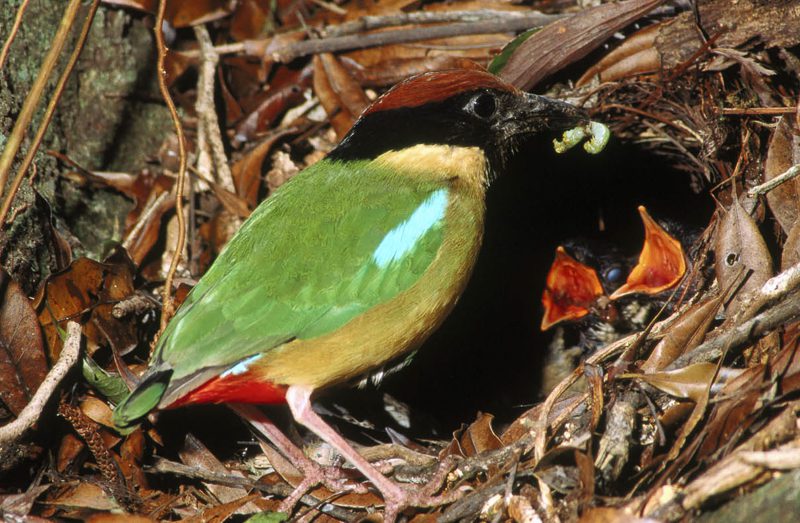
Feeding the chicks. How can one chick physically digest so many insects, so often, in such a short time!
It’s hard to imagine how a small chick can physically digest so many insects so often in such a short time! From the moment they hatched, these chicks were crammed full of insects, including caterpillars, worms, centipedes, spiders and even flesh extracted from the Giant Panda Snail. As the chicks grew older, the quantity of insects increased dramatically, though the frequency between feeds decreased significantly.
After feeding a chick, the parent bird waited patiently until the chick released a faecal sac. The parent then took the sac in its bill and proceeded to fly a fair distance from the nest to dispose of it. The theory behind this behaviour is that it prevents odours from building up within the nest, thus detracting predators such as Green Catbirds, Carpet Pythons or Dingoes.
For most of the time, the parent birds used exactly the same flight path, close to the ground, and landed on the same perch before entering the nest, being quite systematic in their approach. On a few occasions when I approached too close to the fledged chicks, one of the adult Pittas gave a loud ‘keow’ call, thought to be a warning or alarm call. The adult would try and distract me away from its offspring by flying quite close to me, then feigning injury. It would drop its wing to the ground, while the second parent would try and call the chick with a series of frequent, low-volume calls from a distance.
Observing Noisy Pittas
In my experience, Noisy Pittas are generally shy, wary and quite elusive at times, despite their brilliantly coloured plumage. When searching for the Pitta, it’s best to start by listening for its distinctive two-note call – thought to be used mainly to attract a mate as well as being territorial, particularly during the breeding season. This call can be heard throughout the day, especially at dawn, but also just after dark.
Apart from their call, another sign of the Pitta’s presence is the discovery of discarded rainforest snail shells (i.e. Giant Panda Snail) near a rock. This rock is commonly referred to as an ‘anvil’ due to the Pitta’s habit of repeatedly bashing snails against it in order to extract the prize within. Often, whole shells will be seen lying intact near the anvil, with only the centre smashed open. Once an anvil is established, the Noisy Pitta will commonly return to it to crack open its snail shells.
Even though Noisy Pittas are mostly found foraging amongst the leaf litter, they will roost high in trees at night so as to avoid predators.
With its strikingly coloured plumage, engaging mannerisms and elusive nature, the Noisy Pitta is a favourite among birders, including myself. Regularly I walk the numerous trails of Lamington National Park as a Guide, birders in tow, looking for the rainforest’s countless fascinating birds. When I hear my friend the Pitta’s distant ‘Walk-to-work’ call echoing at me, I can’t help but smile at the irony – I am walking to work!
If you are interested in learning more about how to photograph birds in Lamington National Park from experienced nature photographer Michael Snedic, you might like to join his next bird photography workshop at Lamington National Park.
First published in Wingspan Magazine.